Introduction
Few science experiments stop children dead in their tracks quite like the magic milk experiment. One moment you have a plain white plate of milk with a few drops of food coloring sitting perfectly still. The next—with a single touch of a soapy cotton swab—the colors explode outward in swirling, spiraling patterns that look more like abstract art than kitchen chemistry.
The magic milk experiment for kids explanation is one of the most searched science activities for good reason. It is fast, cheap, visually jaw-dropping, and packed with real scientific concepts that stretch from surface tension all the way to molecular chemistry. Best of all, every single ingredient is already in your kitchen right now.
But here is the thing — most guides show you how to do the magic milk experiment without ever properly explaining why it works. And for children aged 5 to 12, understanding the why is what transforms a cool trick into a genuine scientific discovery.
In this complete guide, you will get the full magic milk experiment for kids explanation—the step-by-step instructions, the deep science behind the swirling colors, common mistakes to avoid, and seven creative variations that take this experiment to the next level. By the end, your child will not just have done a cool experiment — they will actually understand the chemistry happening right in front of their eyes.
What Is the Magic Milk Experiment?
The magic milk experiment is a classic science activity that demonstrates surface tension, emulsification, and molecular polarity using just three ingredients: milk, food coloring, and dish soap.
When food coloring drops are placed on the surface of milk and a drop of dish soap is added, the colors erupt into rapid, swirling patterns that continue for 30 to 60 seconds before gradually slowing as the reaction completes.
The magic milk experiment for kids’ explanation centers on one key scientific actor—fat. The fat molecules in milk are distributed across the surface in a relatively stable arrangement. Dish soap is a surfactant—a molecule that is attracted to both fat and water simultaneously. When soap touches the milk surface, it disrupts this arrangement dramatically and rapidly, setting the whole surface in motion.
The food coloring does not cause the movement. It simply rides along, making the otherwise invisible molecular activity completely visible to the naked eye. In this way, food coloring in the magic milk experiment functions exactly the way dye functions in a scientist’s lab — as a tracer, revealing movement that would otherwise be invisible.
The Science Behind the Magic Milk Experiment for Kids Explanation
To fully understand the magic milk experiment for kids explanation, it helps to break the science into three connected concepts.
Surface Tension
Every liquid has surface tension — a property caused by molecules at the surface being pulled inward and sideways by neighboring molecules, but not outward into the air. This creates a kind of invisible skin on the liquid’s surface.
Milk has surface tension just like water. The fat and protein molecules at the surface are arranged in a relatively stable pattern that resists disruption — until the soap arrives.
Surfactants and Fat Molecules
Dish soap is a surfactant—short for “surface-active agent.” Surfactant molecules have a fascinating dual structure: one end is hydrophilic (attracted to water) and the other end is lipophilic (attracted to fat and oil).
When a drop of soap touches the milk surface, the lipophilic ends of soap molecules immediately race toward the nearest fat molecules, trying to bond with them. This creates a sudden, rapid movement across the entire milk surface as fat molecules scatter away from the advancing soap.
This molecular scramble is what your child sees as the dramatic explosion of color. The food coloring is simply caught up in the rushing currents created by this molecular chase.
Emulsification
As the soap molecules surround the fat molecules, they form tiny spherical structures called “micelles”—soap molecules arranged in a ball with their fat-loving ends pointing inward (holding onto fat) and their water-loving ends pointing outward (interacting with the watery parts of the milk).
This process of breaking fat into tiny droplets surrounded by soap is called “emulsification”—the same process that occurs when you wash greasy dishes. The soap does not make fat dissolve in water. Instead, it suspends it in tiny droplets that water can then wash away.
Once most of the fat molecules have been surrounded by soap micelles, the frantic molecular movement slows and the colors settle into their final swirled pattern. The reaction is essentially complete, which is why adding a second drop of soap to the same spot produces much less movement. The soap has already done its job in that area.
This complete magic milk experiment for kids explanation covers three university-level chemistry concepts—surface tension, surfactant chemistry, and emulsification—all visible to a 5-year-old with a plate of milk and a cotton swab.
What You Need for the Magic Milk Experiment
Ingredients:
- Whole milk or full-fat milk (the higher the fat content, the better the result)
- Food coloring — at least 3 or 4 different colors
- Dish soap (regular washing-up liquid works perfectly)
- Cotton swabs (Q-tips)
- A shallow white plate or dish
Optional Enhancements:
- An eyedropper for more precise color placement
- A timer to measure how long the reaction lasts
- A notebook for recording observations
Step-by-Step Instructions
Step 1: Pour enough whole milk into the shallow plate to completely cover the bottom with a layer about 5mm deep. Allow the milk to settle and come to room temperature — cold milk from the refrigerator produces a slightly slower reaction.
Step 2: Add drops of food coloring around the surface of the milk. Space them out — place red near one edge, blue in the center, yellow near another edge, and green elsewhere. Do not stir, do not swirl, and do not move the plate. The colors should sit as distinct drops on the milk surface.
Step 3: Pour a small amount of dish soap into a separate cup or bottle cap. You only need a few drops.
Step 4: Dip the tip of a cotton swab into the dish soap, coating the tip generously.
Step 5: Slowly and steadily bring the soapy cotton swab tip to the surface of the milk — right in the center of one of the color drops — and hold it there without stirring or swirling. Just touch and hold.
Step 6: Watch. Within one second, the colors will begin to race away from the point of contact, swirling and mixing in spectacular patterns. Hold the swab in place for 10–15 seconds and observe the sustained movement.
Step 7: Lift the swab away. Touch it to a different area of the milk surface. Notice that the reaction is weaker now — the soap nearby has already interacted with the fat molecules.
Step 8: Dip a fresh cotton swab in soap and touch it to a fresh area of the milk. The reaction begins powerfully again.
Why Full-Fat Milk Works Best — A Key Part of the Magic Milk Experiment for Kids Explanation
One of the most common questions about the magic milk experiment for kids’ explanation is why full-fat milk produces such dramatically better results than skimmed or semi-skimmed milk.
The answer is simple: more fat means more reaction.
Dish soap’s dramatic effect on the milk surface is entirely driven by its interaction with fat molecules. Full-fat whole milk contains approximately 3.5% fat content. Semi-skimmed contains around 1.5–1.8%. Skimmed milk contains less than 0.5%.
The more fat molecules present at the surface, the more violently and extensively they scatter when soap is introduced. More fat equals more molecular movement, more sustained swirling, and more spectacular color patterns.
You can actually turn this into a proper scientific investigation by repeating the experiment with whole milk, semi-skimmed milk, and skimmed milk—observing and measuring the difference in reaction intensity and duration. This transforms the magic milk experiment for kids’ explanation from a demonstration into a controlled experiment—one that would make an excellent school science fair project.
Additional fats that work: Some families have also had success using single cream or double cream, which have even higher fat content than whole milk. The reaction with cream is extraordinarily intense and fast — well worth trying once the basic experiment has been mastered.
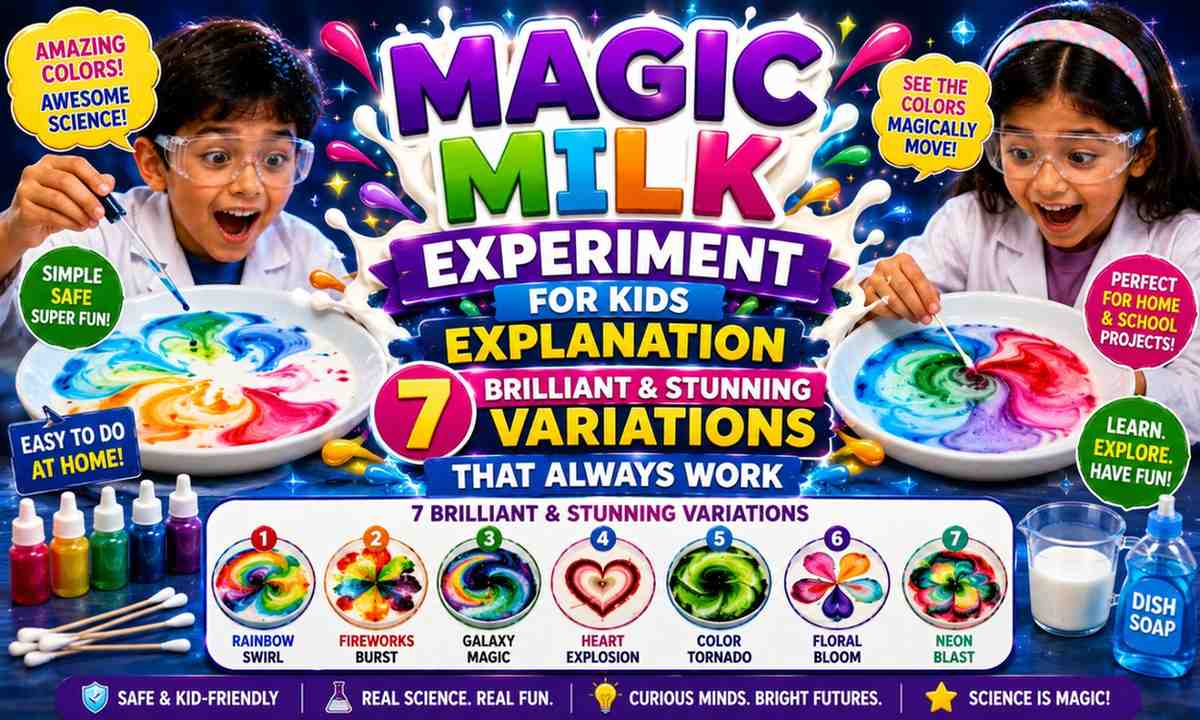
7 Brilliant Variations of the Magic Milk Experiment
Once your child has mastered the basic experiment and understood the science, these seven variations extend the learning and keep the wonder alive.
Variation 1: The Comparison Test
Set up four identical plates—one with whole milk, one with semiskimmed, one with skimmed milk, and one with water. Add the same colors and the same amount of soap to each. Compare the intensity and duration of the reaction side by side. This is proper scientific comparison—forming a hypothesis and testing it with controlled variables.
Variation 2: Temperature Test
Set up two plates of whole milk—one straight from the refrigerator and one warmed gently to room temperature. Add colors and soap to both simultaneously. Observe whether temperature affects the speed or intensity of the reaction. Warmer milk has slightly more molecular movement, which may affect how dramatically the soap disrupts the surface.
Variation 3: Soap Concentration Test
Use three plates of whole milk. Add a tiny amount of soap to the first, a medium amount to the second, and a generous amount to the third. Compare the reactions. Does more soap equal a more dramatic result? At what point does additional soap stop improving the reaction?
Variation 4: Different Soap Types
Try dish soap, hand soap, baby shampoo, and shampoo. Each is a surfactant but with different concentrations of active ingredients. Which produces the most dramatic reaction? Which lasts the longest? This teaches children that not all soaps are chemically identical.
Variation 5: Milk Painting
Set up a large shallow tray with whole milk and add 6–8 colors around the surface in a deliberate artistic pattern. Use multiple cotton swabs with soap to create a planned color composition—using the swirling reactions to create a piece of abstract art. When the colors have settled, lay a piece of white paper gently on the surface, lift it off, and you’ll have a unique milk painting to keep.
Variation 6: Slow Motion Observation
If you have a smartphone, record the experiment in slow-motion video (most smartphones have a 120fps or 240fps slow-motion setting). Watching the initial color explosion in slow motion reveals extraordinary detail about how the soap disrupts the milk surface — you can see the individual color fronts racing outward from the point of contact. This connects science to technology beautifully.
Variation 7: Cream vs. Milk Race
Set up two identical plates simultaneously—one with whole milk and one with single cream. Add the same colors and touch both with soapy swabs at exactly the same moment. Cream’s higher fat content creates a reaction so much more intense and fast than milk’s that children are consistently astonished. This variation makes the connection between fat content and reaction intensity completely unmistakable.
Common Mistakes and How to Fix Them
Even a well-understood experiment can go wrong if a few key details are missed. Here are the most common problems with the magic milk experiment for kids’ explanation and exactly how to solve them.
Problem: The colors barely move. Cause: Skimmed or low-fat milk, old dish soap, or cold milk. Fix: Switch to whole milk at room temperature and use fresh, standard dish soap.
Problem: The reaction stops almost immediately. Cause: Too much soap has already been applied to the milk surface — the fat molecules in that area are already surrounded by soap micelles. Fix: Use a fresh plate of milk. Apply soap more sparingly and touch different areas of the surface.
Problem: The colors mix into a muddy brown immediately. Cause: Too many colors placed too close together, or too much swirling with the swab. Fix: Space your color drops further apart. Touch and hold the swab—do not stir or drag it.
Problem: The plate is too deep and the milk is too thick. Cause: Using a bowl or deep dish instead of a shallow plate. Fix: Use the shallowest dish you have — a dinner plate works perfectly. The experiment works best when the milk layer is thin, allowing the surface reaction to dominate.
Problem: Adding a second drop of soap produces nothing. Cause: The fat molecules near that area are already emulsified. The soap has completed its work there. Fix: Move to a fresh area of the plate. Or start fresh with a new plate of milk.
Connecting the Magic Milk Experiment to Real-World Science
The magic milk experiment for kids’ explanation is not just a kitchen trick—it demonstrates principles used across multiple real-world scientific and industrial fields.
Cleaning and hygiene: The same emulsification process that creates the swirling colors is exactly how soap cleans your hands and dishes. Soap molecules surround grease and fat, allowing water to wash them away.
Food science: Emulsification is used in food manufacturing to create products like mayonnaise, salad dressings, and ice cream—where fat and water are blended together in stable emulsions using emulsifying agents.
Medicine: Surfactants are used in drug delivery systems, helping medications interact with cell membranes (which are largely made of fat-based phospholipids)—the same fat-loving chemistry at work in the milk experiment.
Environmental science: Understanding how surfactants interact with fats and oils is crucial in environmental cleanup—particularly in oil spill remediation, where surfactants are used to break up oil slicks on water.
When children understand the full magic milk experiment for kids explanation, they are not just learning a party trick. They are building the foundational vocabulary of surface chemistry that underpins biology, medicine, food science, and environmental science.
Frequently Asked Questions (FAQ)
Q1: Why does the magic milk experiment work? Dish soap is a surfactant that is attracted to the fat molecules in milk. When soap touches the milk surface, it causes fat molecules to race away, creating visible swirling patterns in the food coloring. The full magic milk experiment for kids explanation involves surface tension, molecular polarity, and emulsification working together.
Q2: What type of milk works best for the magic milk experiment? Whole milk or full-fat milk works best because it contains the most fat — approximately 3.5%. The higher the fat content, the more dramatic and sustained the reaction. Skimmed milk produces a noticeably weaker result.
Q3: Why does the reaction slow down and stop? Once the soap molecules have surrounded all the available fat molecules in the area with micelles, there are no more free fat molecules to react with. The driving force of the reaction is gone, and the movement stops. Adding soap to a fresh area of the plate restarts the reaction.
Q4: Can you do the magic milk experiment with plant-based milk? Plant-based milks like oat milk and almond milk contain very little fat compared to whole dairy milk, so the reaction is significantly weaker. Coconut milk, which is high in fat, produces the best results among plant-based alternatives — though still not as dramatic as full-fat dairy milk.
Q5: Does the type of dish soap affect the result? Yes. Standard washing-up liquid with a high concentration of surfactants produces the strongest reaction. Diluted or gentle baby soaps produce a weaker effect. Avoid antibacterial soaps, as they sometimes contain additional ingredients that interfere with the reaction.
Conclusion
The magic milk experiment for kids explanation is proof that the most spectacular science does not require expensive equipment, specialist chemicals, or a university laboratory. It requires only milk, soap, and food coloring—and a willingness to ask the question that all great scientists ask: why?
When children understand that the swirling colors are not magic but molecular chemistry—that soap molecules are literally chasing fat molecules across the surface of the milk at speeds visible to the naked eye—something important happens. Science stops being a subject and starts being a lens. A way of seeing the hidden machinery operating behind every ordinary thing in the world around them.
The milk in the fridge. The soap by the sink. The food coloring in the cupboard. All of them, it turns out, are science experiments waiting to happen.
So pour the milk, drop the colors, touch the soap, and watch the world reveal itself. Because that is what the best science always does.
External Resource (DoFollow): For more educator-reviewed chemistry experiments and detailed scientific explanations for kids, visit Science Buddies—a free, comprehensive STEM platform trusted by teachers and parents worldwide.