Introduction
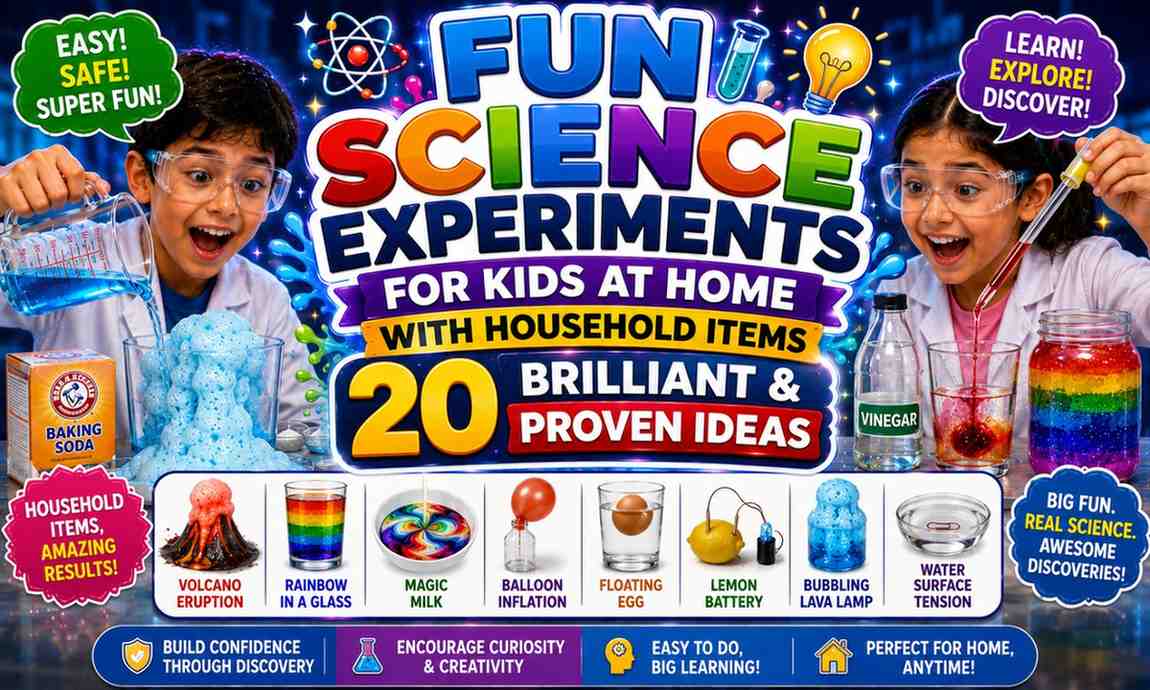
If you have curious kids and a well-stocked kitchen, you already have everything you need to turn your home into a science lab. Fun science experiments for kids at home with household items are not only budget-friendly — they are also one of the most powerful ways to build a child’s love of learning. Whether your little scientist is 5 or 12, these hands-on activities teach real concepts in chemistry, physics, and biology without a single boring textbook.
In this guide, we cover 20 easy, messy, and always-successful experiments — from baking soda explosions to dancing raisins — each explained with clear steps, the science behind it, and age-appropriate tips. No lab coat required. No special equipment needed. Just kitchen stuff and a whole lot of wonder.
Baking Soda and Vinegar Experiments for Kids Step by Step — 10 Cool Variations Beyond the Volcano
The classic volcano is just the beginning. Baking soda and vinegar experiments for kids step by step open a door to understanding acid-base reactions in colorful, bubbly ways.
What You Need:
- Baking soda (bicarbonate of soda)
- White vinegar or apple cider vinegar
- Food coloring
- Dish soap (optional, for extra foam)
- Containers, trays, or balloons
10 Step-by-Step Variations:
- Rainbow Fizz Tray — Drop food coloring in different colors across a baking tray dusted with baking soda. Use a dropper to drip vinegar on each color. Watch a rainbow erupt!
- Fizzy Balloon Inflation — Pour vinegar into a bottle, spoon baking soda into a balloon, attach the balloon to the bottle neck, and lift — the balloon inflates with CO₂ gas.
- Baking Soda Boats — Shape foil into a boat, add a baking soda and dish soap paste, place in a tub of vinegar-water, and watch it zoom across the surface.
- Color-Changing Cabbage Juice pH Test — Mix boiled red cabbage water with vinegar (acid) vs. baking soda water (base) and compare the dramatic color shifts.
- Fizzy Ice Cubes — Freeze baking soda into ice cube trays with water. Drop them into vinegar and watch them fizz as they melt.
- Erupting Citrus Volcano — Cut a lemon in half, sprinkle baking soda on top, and add a drop of dish soap. The natural citric acid creates a slow, fragrant eruption.
- Bath Bomb Science — Mix baking soda, citric acid (or crushed vitamin C tablet), oil, and water. Press into a mold. Drop it in water and observe the fizzing reaction.
- Vinegar Egg Shell Dissolve — Submerge a raw egg in vinegar for 24–48 hours. The shell (calcium carbonate) dissolves, leaving a rubbery, bouncy egg — amazing for kids!
- Fireproof Candle Trick — Pour CO₂ (invisible gas from the baking soda-vinegar reaction) over a candle flame to extinguish it without blowing — science magic!
- Giant Foam Snake — Fill a large bottle with baking soda, pour in vinegar with dish soap and food coloring, and watch a foam snake crawl out.
The Science: Baking soda (a base) reacts with vinegar (an acid) to produce carbon dioxide gas, water, and sodium acetate. This is a classic acid-base neutralization reaction — one of the most fundamental concepts in chemistry. Learn more at Science Buddies — a free, educator-reviewed resource for K–12 science.
Easy Science Experiments for 10 Year Olds at Home — No Special Equipment Needed, Just Kitchen Stuff
Ten-year-olds are ready for slightly more complex thinking, but they still need experiments that deliver fast, visible results. Easy science experiments for 10 year olds at home should challenge without frustrating — and every activity here fits that sweet spot.
Density Tower — Layer liquids like honey, dish soap, water, and vegetable oil in a tall glass. Each layer floats because of different densities. Drop small objects and predict where they will stop. This introduces fluid dynamics in a stunning visual way.
Homemade Compass — Magnetize a needle by stroking it with a magnet, float it on a leaf in water, and it points north. This demonstrates Earth’s magnetic field beautifully and reliably.
Milk Plastic — Heat whole milk gently, add a tablespoon of vinegar, and the curds that form can be shaped into a plastic-like material called casein plastic — a gateway into polymer chemistry that surprises every child who tries it.
Paper Bridge Engineering Challenge — Use only paper and tape to build a bridge over a 30 cm gap that holds coins. This is structural engineering applied to everyday materials — and it becomes fiercely competitive between siblings.
These activities are ideal for school projects, rainy day entertainment, or just quenching a naturally curious mind. For more project ideas, see our related guide on setting up a home science corner for kids.
Magic Milk Experiment for Kids Explanation — What Happens, Why It Works & How to Do It Right
The magic milk experiment for kids explanation is one of the most visually stunning of all fun science experiments for kids at home with household items. Here is exactly how it works.
What You Need:
- Whole milk (full fat works best)
- Food coloring (multiple colors)
- Dish soap
- Cotton swab
- A shallow bowl or plate
Steps:
- Pour milk into a shallow dish — just enough to cover the bottom.
- Add drops of different food colorings across the surface — do not stir.
- Dip a cotton swab in dish soap.
- Touch the soapy cotton swab to the center of the milk.
- Watch the colors explode and swirl dramatically for 30–60 seconds.
Why It Works: Milk contains fat and protein molecules. Its surface holds a certain tension. When dish soap (a surfactant) touches it, the soap molecules race to attach to the fat molecules, breaking the surface tension and causing the liquid to move in all directions. The food coloring rides along, creating those beautiful swirling patterns. Adding more soap to different spots keeps the show going longer. This is a visual demonstration of surface tension, molecular polarity, and emulsification — advanced chemistry concepts made completely accessible to young children.
Elephant Toothpaste Experiment for Kids Easy Version — Safe Ingredients, Step-by-Step & Science Behind It
The elephant toothpaste experiment for kids easy version is one of those experiments that never fails to get gasps. The foam erupts rapidly out of a bottle like a giant squeeze of toothpaste — hence the legendary name.
Safe Version Ingredients:
- 1/2 cup hydrogen peroxide (3% — standard drugstore variety, completely safe)
- 1 tablespoon dry yeast
- 3 tablespoons warm water
- Dish soap
- Food coloring (optional)
- Tall plastic bottle
Steps:
- Pour hydrogen peroxide into the bottle.
- Add a generous squirt of dish soap and food coloring.
- In a separate cup, mix yeast with warm water and stir for 30 seconds.
- Quickly pour the yeast mixture into the bottle.
- Stand back and watch the foam erupt tall and fast!
The Science: Hydrogen peroxide naturally breaks down into water and oxygen gas, but it does so very slowly. Yeast acts as a catalyst, dramatically speeding up this decomposition. The dish soap traps the rapidly released oxygen into millions of bubbles, causing the foam to expand and shoot upward. This is an exothermic reaction — the foam will feel warm to the touch but is completely safe for kids to handle. This single experiment introduces catalysis, decomposition reactions, and exothermic chemistry all at once.
Science Experiments for Kids Using Water — 15 Splash-Worthy Activities for Ages 5 to 12
Water is the world’s most accessible science tool. Science experiments for kids using water cover physics, chemistry, and biology — and every one of these fun science experiments for kids at home with household items involves nothing more exotic than your kitchen tap.
15 Water Experiments to Try:
- Walking Water — Color water in three cups, connect with paper towels, and watch it walk between cups through capillary action.
- Ice Fishing — Balance an ice cube on a string by sprinkling salt — demonstrates freezing point depression.
- Waterproof or Not? — Test which household materials repel water (wax paper, plastic, fabric) and which absorb it.
- Tornado in a Bottle — Connect two bottles, fill one with water, swirl and flip — a water vortex forms.
- Surface Tension Boat — Float a foil boat, add a drop of soap behind it to watch it surge forward.
- Rain in a Jar — Hot water in a jar with ice on top creates condensation — a model of the water cycle.
- Invisible Ink — Write with lemon juice, let dry, hold over a light bulb to reveal the hidden message.
- Penny Drops — How many drops of water can a penny hold? Explore cohesion of water molecules.
- Color Mixing Tubes — Use syringes to inject colored water and mix colors in a clear tube.
- Floating Paper Clip — Place a paper clip gently on still water to show surface tension.
- Bernoulli Balloon — Hold two balloons apart, blow air between them — they come together, not apart.
- Salt Water Float — Float an egg in fresh water (sinks), then salt water (floats) — buoyancy made clear.
- Soap-Powered Boat — Attach a drop of dish soap to a paper boat and place on water.
- Whirlpool in a Bottle — Add glitter to water in a sealed bottle and spin.
- Hot vs. Cold Water Mixing — Use food coloring to see how temperature affects water density.
Slime Science Experiment for Kids Without Borax — 3 Safe Recipes That Actually Work Every Time
Parents searching for a slime science experiment for kids without borax will love these three recipes. Each is safe, effective, and doubles as a tactile lesson in polymer chemistry.
Recipe 1: Contact Lens Solution Slime Mix 1/2 cup white PVA glue with 1/4 teaspoon baking soda. Add 1 tablespoon of contact lens solution slowly. Stir, then knead until slime forms. Add glitter or color as desired.
Recipe 2: Cornstarch Oobleck Mix 1 cup cornstarch with 1/2 cup water and food coloring. Stir slowly. This creates a non-Newtonian fluid — solid when pressure is applied, liquid when relaxed. One of the most fascinating fun science experiments for kids at home with household items you can make in under two minutes.
Recipe 3: Guar Gum Slime Dissolve 1/4 teaspoon guar gum powder in 1 cup of water. Add a borax-free activator slowly until gel forms. A great food-safe alternative perfect for very young children and toddlers.
Crystal Growing Experiment for Kids at Home — How to Grow Beautiful Crystals in Just 3 Days
The crystal growing experiment for kids at home teaches supersaturation, nucleation, and molecular structure in a way kids will absolutely treasure. You can grow real, sparkling crystals using just salt or sugar.
Steps to Grow Salt Crystals in 3 Days:
- Heat 1 cup of water until nearly boiling.
- Stir in 3–4 tablespoons of table salt until no more dissolves (supersaturated solution).
- Pour into a clean glass jar.
- Tie a piece of string to a pencil and hang it in the jar without touching the sides.
- Leave undisturbed in a cool, stable spot for 3 days.
- Watch as cubic salt crystals form along the string!
Why It Works: As the water cools and evaporates, it can no longer hold all the dissolved salt. Salt molecules begin to stack in orderly, repeating patterns, forming visible crystalline structures. The longer you wait, the larger and more impressive the crystals become — patience rewarded with genuine beauty.
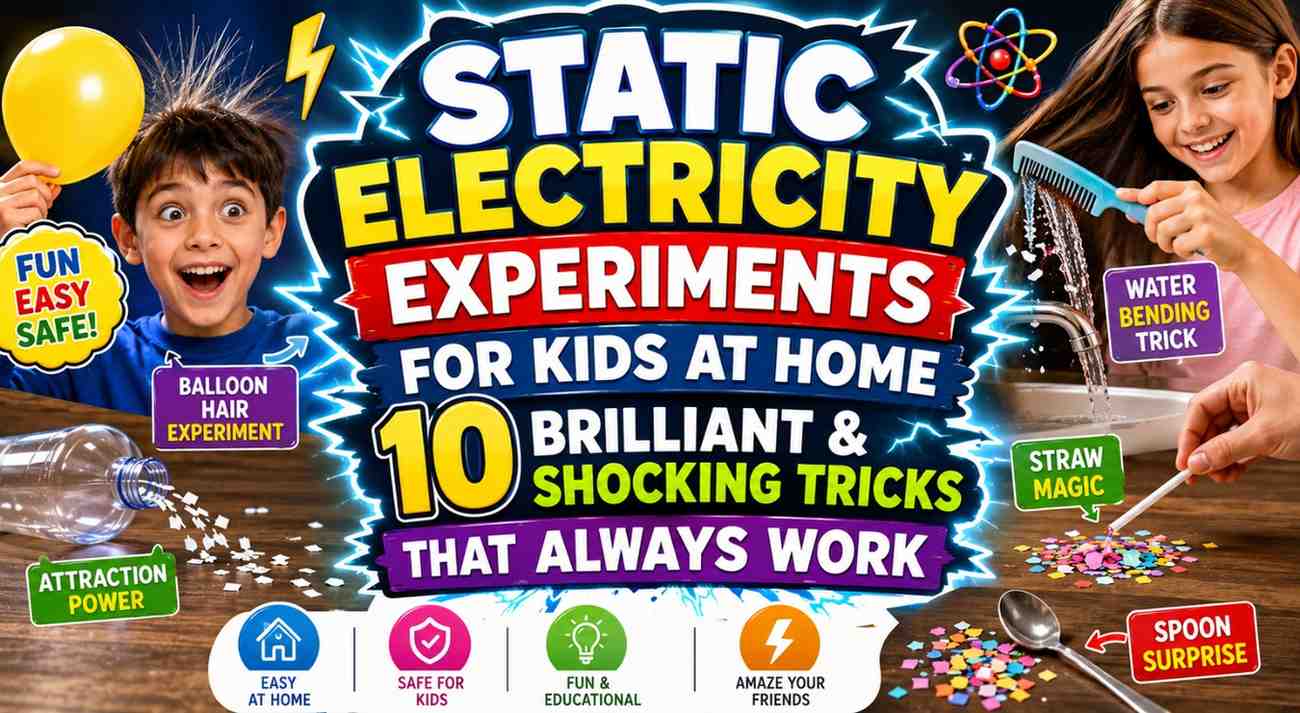
Static Electricity Experiments for Kids at Home — Balloons, Pepper & Bending Water Tricks Explained
Static electricity experiments for kids at home demonstrate one of the most invisible yet dramatic forces in nature. These are among the most loved fun science experiments for kids at home with household items because the results feel genuinely magical.
Bending Water with a Balloon — Rub an inflated balloon on your hair for 10 seconds, then hold it near a thin stream of water from the tap. The water bends toward the balloon due to electrostatic attraction between the negatively charged balloon and the polar water molecules.
Dancing Pepper Trick — Sprinkle ground pepper on a plate, rub a balloon on hair, and hover it just above — the lightweight pepper leaps up to cling to the balloon instantly.
Floating Balloon — Charge a balloon by rubbing it on your hair and stick it to the wall. It stays there — demonstrating induced charge on the wall surface.
Salt and Pepper Separator — Mix salt and pepper together. Use a charged comb to lift only the lighter pepper, separating the mixture — real-world electrostatics at work.
The Science: Rubbing two objects together causes a transfer of electrons, leaving one object negatively charged. Opposite charges attract — that is why water, paper, or pepper moves toward the charged object. This is the foundational concept behind electrostatics and the triboelectric effect.
Dancing Raisins Experiment for Kids Explanation — The Simple Soda Trick That Teaches Density & Buoyancy
The dancing raisins experiment for kids explanation is one of the simplest, most satisfying of all fun science experiments for kids at home with household items — and it uses just three everyday items.
What You Need:
- A clear glass
- Sparkling water or club soda
- A handful of raisins
Steps:
- Fill the glass with sparkling water.
- Drop in 5–6 raisins.
- Watch them sink, then slowly rise to the top, then sink again — dancing!
Why It Works: Raisins are denser than water, so they immediately sink. But the carbonation produces CO₂ bubbles that attach to the rough, wrinkled surface of the raisins. Once enough bubbles attach, the raisin becomes buoyant and floats to the surface. At the top, the bubbles pop — the raisin becomes dense again and sinks back down. This cycle repeats, creating the hypnotic “dance.” This is a brilliant hands-on lesson in density, buoyancy, and gas behavior — three core physics concepts rolled into one sparkling glass.
Frequently Asked Questions (FAQ)
Q1: What is the easiest science experiment for kids at home? The dancing raisins experiment is arguably the easiest — it requires only sparkling water and raisins and takes under one minute to set up. It is perfect for very young children aged 4 and up.
Q2: Are baking soda and vinegar experiments safe for toddlers? Yes! Baking soda and vinegar are both completely non-toxic and safe. Always supervise young children to prevent splashing in eyes, and use shallow trays to contain the mess effectively.
Q3: What is the best science experiment for a 10-year-old school project? The crystal growing experiment, the density tower, and the milk plastic activity are all excellent for school projects. They deliver strong visual results and have clear scientific explanations that are easy to present to a class or judge.
Q4: How do you make slime without borax? Mix 1/2 cup of white PVA glue with 1/4 teaspoon baking soda, then slowly stir in 1 tablespoon of contact lens solution until slime forms. Knead until smooth and stretchy. This is the most reliable borax-free slime recipe available.
Q5: Why does the magic milk experiment work better with full-fat milk? Full-fat milk has significantly more fat molecules for the soap to interact with, creating more dramatic and sustained movement. Skim milk will still work but produces less impressive swirling results.
Conclusion
Fun science experiments for kids at home with household items are among the greatest gifts you can give a child’s developing mind. They transform everyday objects — vinegar, milk, raisins, salt — into portals for genuine scientific discovery.
Every experiment in this guide has been chosen because it works reliably, teaches a real concept, and is genuinely exciting for children across a wide age range. From the fizzy drama of baking soda and vinegar experiments for kids step by step, to the swirling colors of the magic milk experiment, to the slow, satisfying growth of crystals — each activity offers something unique: a chance to ask why, to form a hypothesis, to observe carefully, and to be truly amazed.
And that amazement? That is exactly where future scientists, engineers, and curious problem-solvers are born.
So lay out some newspaper, pull out your baking soda, and let the glorious mess begin. Science has never been more fun — or more at home.
External Resource (DoFollow): For more verified, educator-reviewed experiments, visit Science Buddies — a comprehensive free platform for K–12 science activities and project guidance.